
Jump to Key Sections
Undoubtedly, Microsoft Word is the most popular word processing application on this planet. There are a lot of useful features you can take advantage during document editing. Among them there is an option known as editing restriction or password protection. This prevents unauthorized users opening or editing the Word file.
Sometimes you may forget Word password, or it is irritating for you to type the password over and over, or other cases. If you remember the password, it is easy to remove password from Word without any issue. However, if you have forgotten the password it is going to create problems for you. That’s why in this article you are going to learn how to remove password from Word with 5 different methods.
In order to remove password from Word document, first you need to learn how to add a password to the Word document.
Tips: If the word document is protected by an open password (can’t view the content), please refer to this step-by-step guide instead. The following sections are focused on removing restriction password from MS Word file.
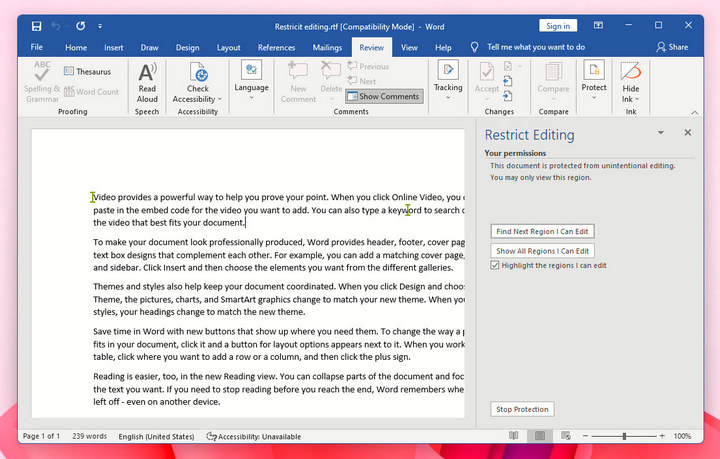
How to Restrict Editing in Word Document?
Option #1. Enable Read Only
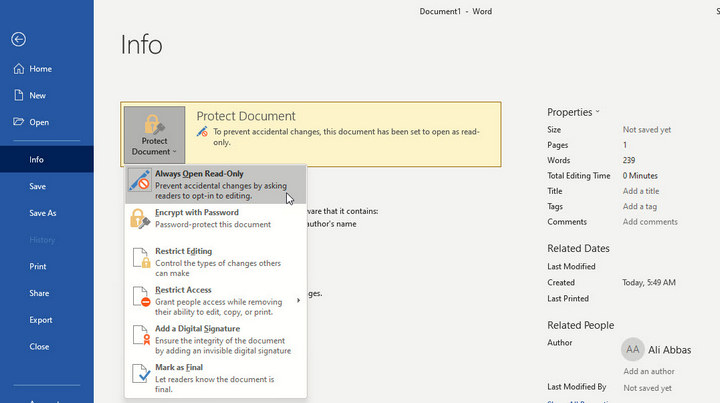
Before restricting editing in the Word document, I’m going to make it available as read only. Go to File > Info > Protect Document and click on the drop-down menu which is the triangle icon. Now choose the first option which is Always Open Read-Only.
Option #2. Enable Restriction on the Word Document
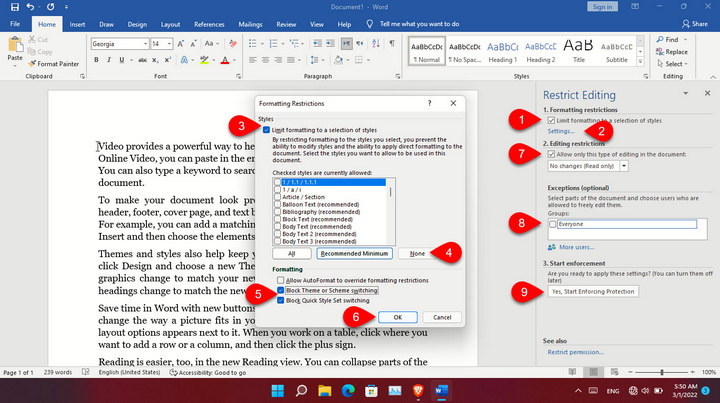
Repeat the process in above and select Restrict Editing in Protect Document menu. It will restrict editing in the right panel on Microsoft Word. First you need to check the box under the formatting restriction. Then click on the settings.
Once the setting window is opened, check the box of limit formatting to a selection of styles, and then click none. After that one under formatting, you have to check boxes block theme or scheme switching and block quick styles set switching, once you are done click OK. After that under the exceptions check the box of everyone and then click on the "yes start enforcing protection".
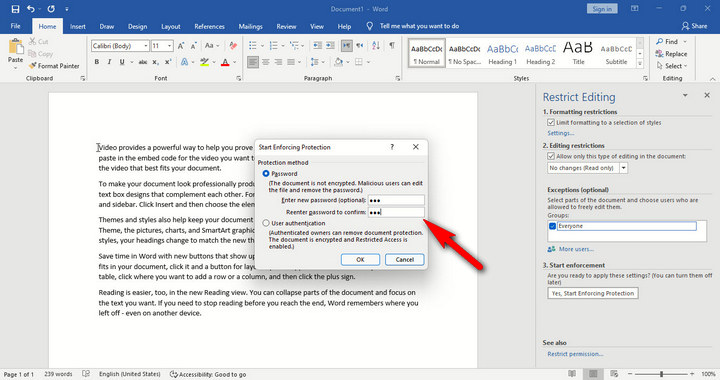
Type a password to make it sure that no one can hear it the document without inserting the password.
Tutorial: How to Remove Password from Word
Suppose you have saved the document in the previous step. After a while suddenly you do not remember the password. In this article you are exactly going to learn how to remove or crack that password.
1.Remove Password from Word via Unprotect Office
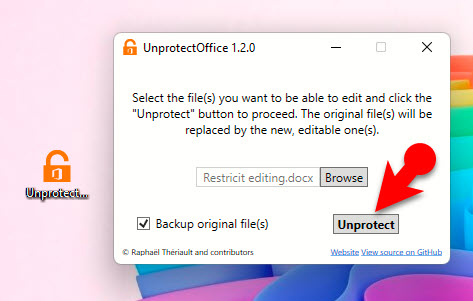
Thanks to the open-source community there are a lot of applications that you can use to remove password from word without purchasing an application online. The first application that comes in mind to unlock the password protection of word document is the unprotected office.
So, first step for you is to download this application from GitHub:
https://github.com/raftario/unprotect-office/releases/
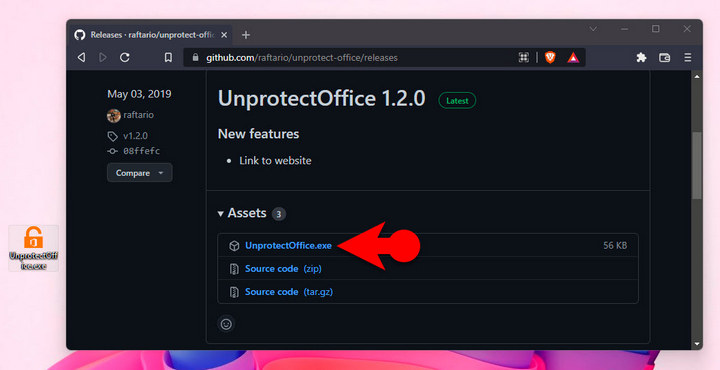
After downloading the application double click on it to open. Simply click on unprotect, it will be done in just a second that’s all. Now go on and open the exact file that you wanted to bring changes to it.
2. Remove Password from Word Files Using craXcel
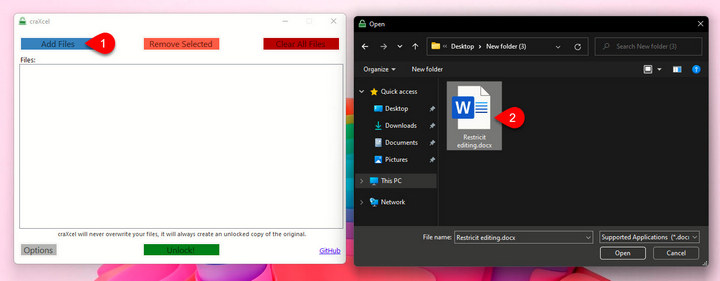
Another open-source tool that I am recommending to use for unlocking office files is craXcel. As the name suggests mostly it is used on files of excel, however I have tested with PowerPoint and Microsoft Word, it works perfectly.
To download Craxcel, click on the below link and get the latest version from GitHub:
https://github.com/petemc89/craXcel-desktop/releases
After downloading craxcel, you have to double click on the app to run it. So basically, you can’t install this application, if you want this app for constant use, you can pin it on the taskbar or on the start menu. To get started with the craXcel, click on the unlock and add Word document to the program.
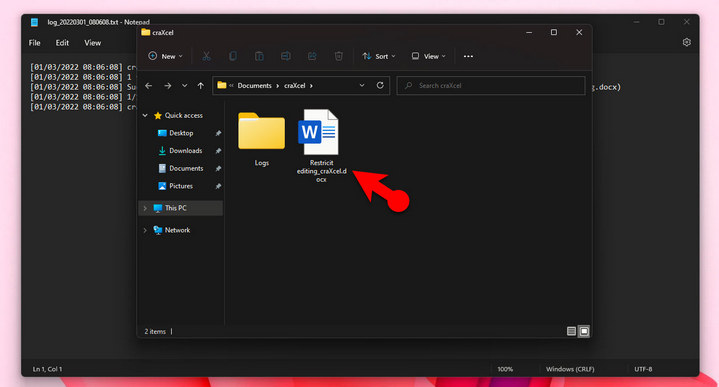
After locating the file, click the read Unlock! button to remove Word password.

Once the unlocking of the document is done, the unlocked located and the a log file window will open on the background.
3. Remove Word Password with iSeePassword Dr.Word
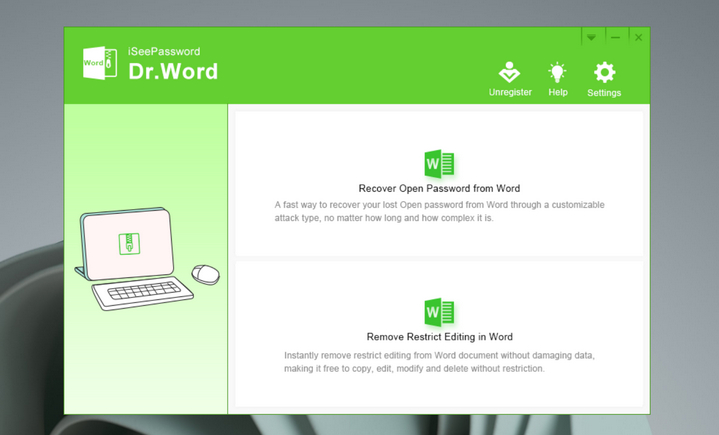
As we know, Microsoft Word has a variety of editions. The above free tools work perfectly for removing password from old Word editions. And they lack support for latest versions. To solve this, iSeePassword Dr.Word is more appropriate in such case. This program is able to recover open password from Word and remove restrict editing in Word as well.
To get started with Dr.Word, please download the software from the following link:
https://www.iseepassword.com/downloads/word-password-recovery.exe
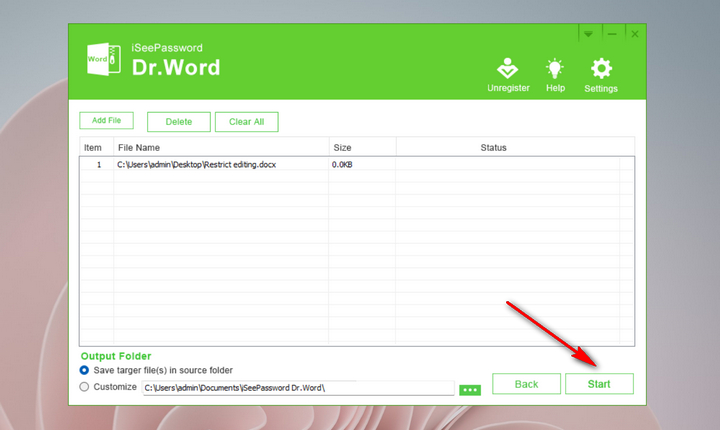
Once the program is installed, launch it from computer desktop and choose the second option to remove restrict editing.
You will be redirected to a new window. From here, add the word file and click the Start button. That’s! The restrict password will be removed instantly. A new copy of unlocked version will be exported at the same location of the original file.
4. Remove Password from Word Manually
Apparently without using any software we can also manually delete the password protection of MS Word. To do it, first step is to install either 7-zip or WinRAR. In this guide I am using WinRAR.
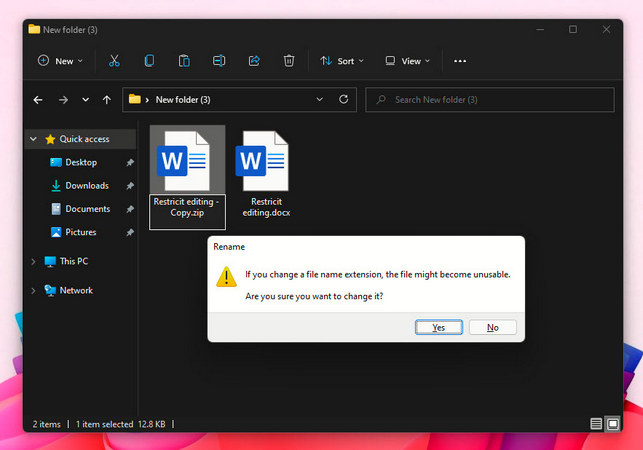
Since we are trying to remove password manually, you may do something wrong, so it is a good idea to duplicate the file first. To do it select the file press Ctrl + C and then press Ctrl +V to paste it.
We need to change the extension of the duplicated document. So, press F2 or right click on the file and choose rename. Change the extension of .docx to .zip and press enter, also ignore the warning.
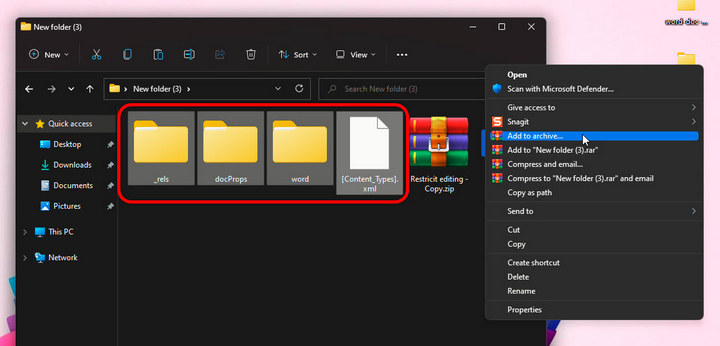
We need to unzip the files to delete the setting.xml. Right click on it at the end "choose show more option" and choose extract here. After extraction, go to the word directory, and delete the settings.xml file.

The final step is to combine all those extracted files and make sure the extension must be zip format. So, select all the files, right click on it and choose show more options, finally choose Add to archive.
In the settings of WinRAR, choose ZIP extension as archive format and click OK.
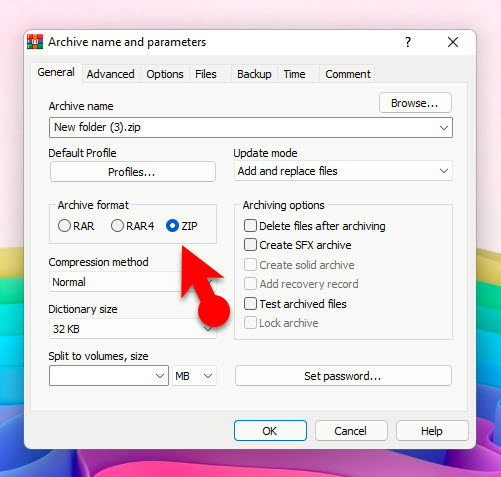
Now it’s time to change the zip extension to word document format, make sure to ignore the warning. Simply open the document and you will notice the protection is gone.
5. Remove password from Word Using Notepad
Notepad is the default text editing program on all Windows computers. We will show you how to do the trick in Notepad in order to remove password from Word. First, we are going to save the document as a trf extension, then we are going to open it with the notepad and remove the password hash.
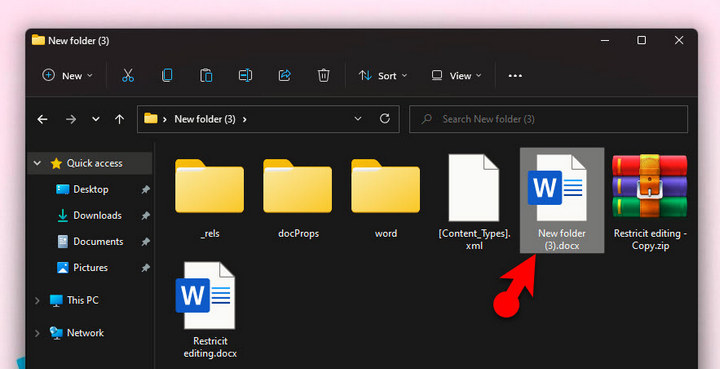
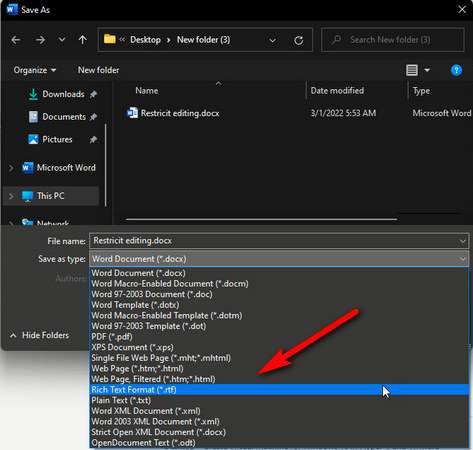
Open the password-protected MS Word document, then click on the file menu go to the save as and save it as a rich text format which has the extension of trf.
Right click on the document and choose open with Notepad. Once the notepad is opened, press Ctrl + F on the keyboard to open the search box , then search there for password hash.
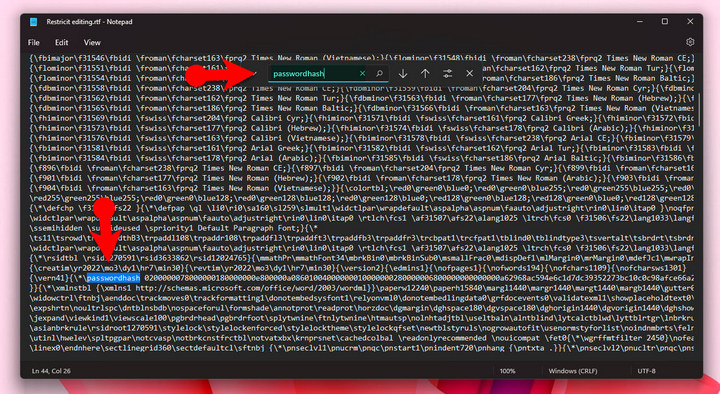
After the password hash, you will see that there are a lot of numbers, you have to simply delete that single line. And replace it with anything that you want, in my case I have written RemovePassword.
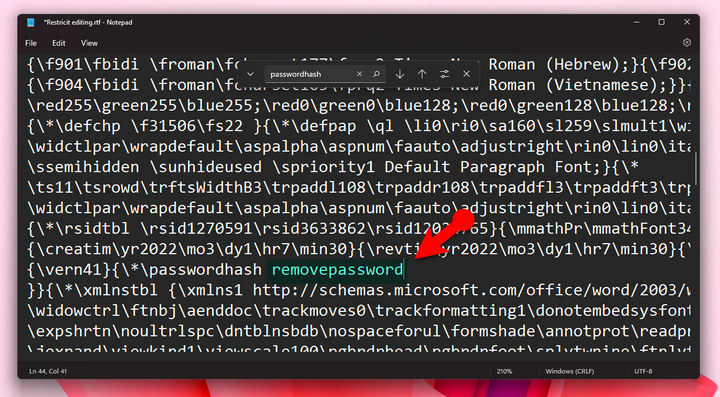
Save the changes inside the notepad, then right click on the file and open it with Microsoft Word. You will notice that there is no password at all you can do anything that you want to the document.
Summary:
There are several ways that you can follow to remove password from Word. Among them I am always encouraging you to use the open-source applications as it is free and clean (no virus, no ads). However, there is no perfect tool out there. If those free tools did not work on your computer, then iSeePassword Dr.Word is a nice choice you can also try it out.