Jump to Key Sections
Even though Windows 11 was officially unveiled on Oct 6 , it might not yet be available on some computer. One major reason is Microsoft plans to release Windows 11 in a stable peace to avoid public complaints when bugs or problems arose. Another reason is that your computer does not meet the minimal hardware requirements of Windows 11. So Microsoft is still rolling out Windows 11 on eligible devices, and your computer may still have a long time from direct upgrade.
Whatever the reason, you need to create a Windows 11 bootable USB if you want to give a try on Windows 11 earlier. In this tutorial, we have shown 5 different tools to help you make Windows 11 bootable USB, along with their pros and cons. This way, it becomes easier for you to choose any one of them for creating your own bootable USB for Windows 11 installation.
[Tips] : Please don’t get discouraged if your PC can’t run Windows 11 this time after checking. There are plenty of tutorials online you can follow to install Windows 11 on unsupported hardware. I managed to run Windows 11 on an old PC without TPM chip and Secure Boot. However, the first step is to create Windows 11 installation media and make a few changes in Registry to bypass Windows hardware checking during installation.
Rufus
Rufus is one of the most popular tools for creating bootable USB for Windows and Linux ISO. It is a free and lightweight utility that comes with portable edition (no installation required). Rufus is not only easy to use, but it also has some nifty features, such as downloading Windows ISO, creating Windows To Go USB. Most importantly, it is a lot faster than the competitors and it is packed with multiple languages.
In recent edition (Rufus 3.16), Windows 11 supported was added by the developer. Now, Rufus is fully compatible with Windows 11 and it can also create Windows 11 bootable USB for both supported PC and unsupported PC, which helps you bypassing hardware checking during Windows 11 installation. This is a great new feature that other bootable USB software failed to offer.
How to use Rufus to create Windows 11 bootable USB? First, go over to the Rufus website (https://rufus.ie/en/), download the latest version from there. Now, insert a USB flash drive and open rufus.exe on your computer.
The USB drive will be detected by Rufus automatically and you can see the drive name at the top. At this time, Rufus asks you import an ISO image this time. Please click the SELECT button and add Windows 11 ISO into the program. A couple of fields, including Partition scheme, Target system, Volume label and File system, will be set automatically with default value. Please don’t touch them and leave as default.
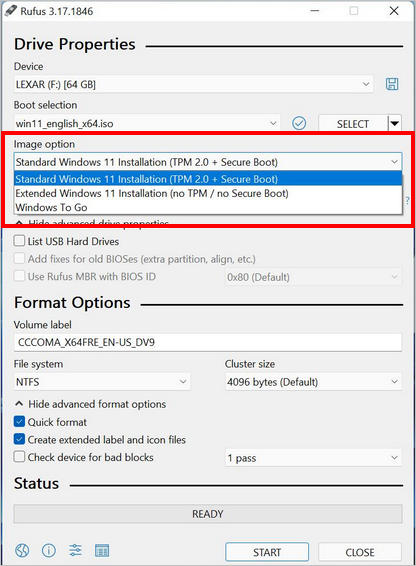
Please pay attention to Image option under Boot selection. There are three menus available once Windows 11 ISO being imported. The first one is Standard Windows 11 Installation, which is great for PCs and laptops that fully meet Windows 11 system requirements. If you plan to install Windows 11 on an unsupported hardware, please go with the second option (Extended Windows 11 Installation).
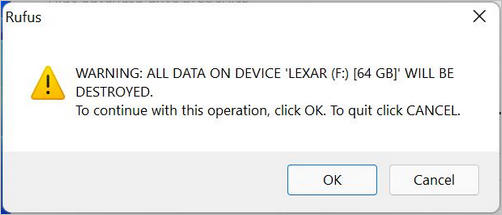
Finally, click Start button to start ISO burning process. It will first format the USB and ask you to confirm the operation as it deletes all data on it.
Now, Rufus copy Windows 10 ISO to USB drive and there is a progress bar at the bottom.
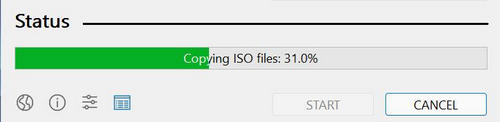
The process will take some time to complete. Once it’s done, it indicates the USB is ready. And you can close Rufus and take out the USB drive which is now a bootable Windows 11 USB flash drive.

Pros:
- Easy to use.
- Free and open-source.
- Support Windows 11 and all major versions of Windows.
- Portable edition available and no installation.
- Extremely fast compared to other similar utilities.
Cons:
- Extended Windows 11 Installation not available on Windows 7 and Windows 8.
- No support team.
- Corrupt USB drive sometimes.
- Can’t run on Linux or Mac.
- Too many settings and may confuse users.
Windows 11 Media Creation Tool
Windows 11 Media Creation Tool is a single purpose system utility that is backed by Microsoft. This is the officially recommended tool for making Windows 11 bootable USB. Unlike Rufus, you don’t need to download Windows 11 ISO image manually. It will download Windows 11 ISO from Microsoft remote server and make a bootable USB from Windows 11 ISO afterward. In short, it is a simple bootable USB creation tool and is available for free.
However, Media Creation Tool is pretty bad considering it does not have any other use other than creating Windows 11 bootable USB only. Also, Media Creation Tool too is known to cause some problems with the USB flash drive, at times it throws a format USB option in the middle of the process even when the USB is already formatted.
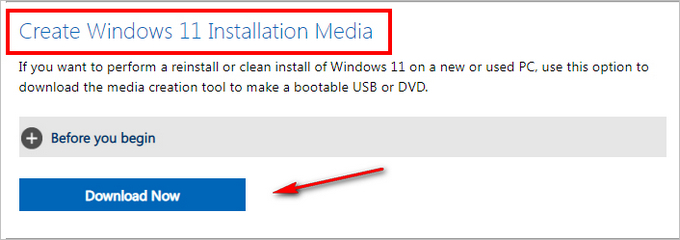
Download Windows 11 Media Creation Tool (https://www.microsoft.com/software-download/windows11) and run MediaCreationToolW11.exe.
Wait a couple of minutes to let the software collect hardware information about current computer. The first thing you’ll see is the license agreement, click on Accept to move to the next step.
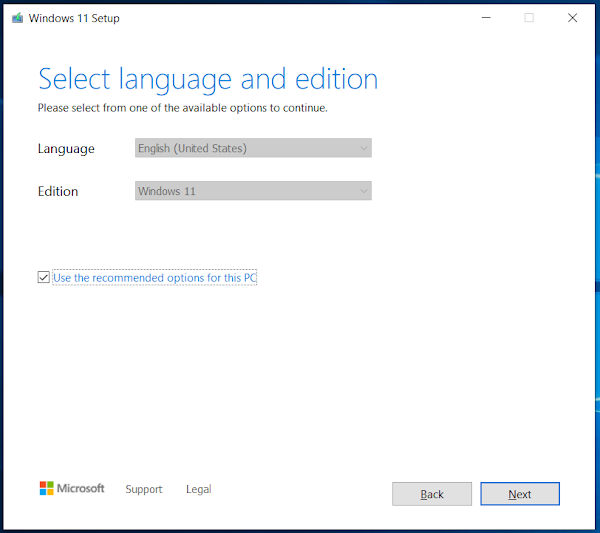
Next, it will ask you to select an Edition of Windows 11 with which you would like to create the bootable USB, and the language. If the default selections are fine, click Next.
Now it will ask you to choose which media you would like to use. Select USB flash drive, insert the blank USB flash drive in your computer, and click on Next.

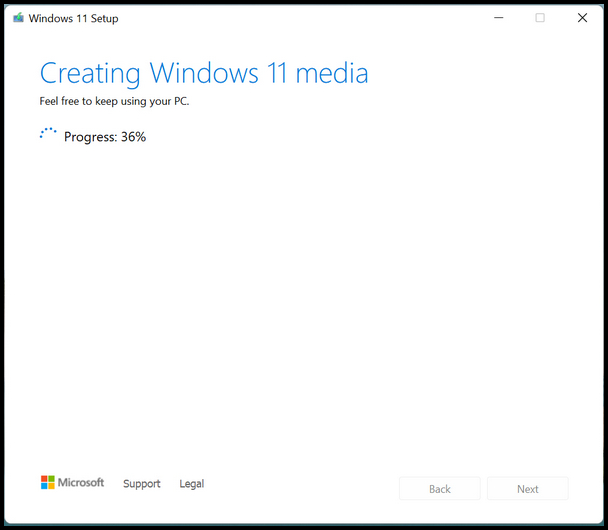
Finally, it will show you the USB flash drive and tell you that the data on it will be deleted. Click on Next to start the process. Once the process complete, it will show you on the screen. You can then close Media Creation Tool and use Windows 11 bootable USB for installing Windows 11 on another PC or laptop.
Pros:
- Native tool from Microsoft.
- Does not need to be installed.
- Automatically download Windows 11 ISO image file .
Cons:
- A bit slow and take more time.
- Create bootable USB for Windows 11 only.
- Throw errors while creating bootable USB on old computer.
UUByte ISO Editor
UUByte ISO Editor is another simple, yet powerful tool that you can use to create Windows 11 bootable USB on a PC or Mac. This tool will also let you extract content from the ISO files, create an ISO file from scratch using files or folders, edit contents of an ISO file, and create ISO files from CD/DVD. They also have a dedicated support team, and a free version of the utility available on their website. Here’s how you can use the ISO Editor to create a bootable USB for Windows 11.
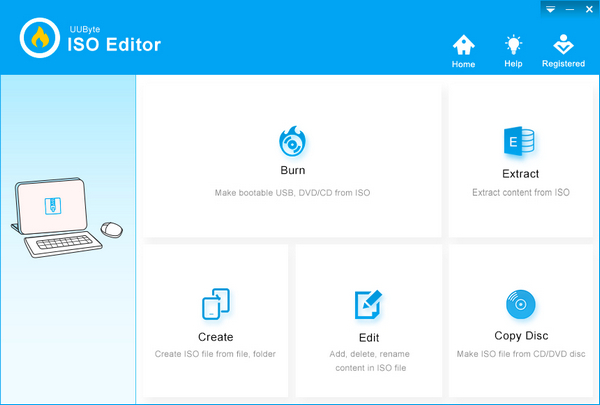
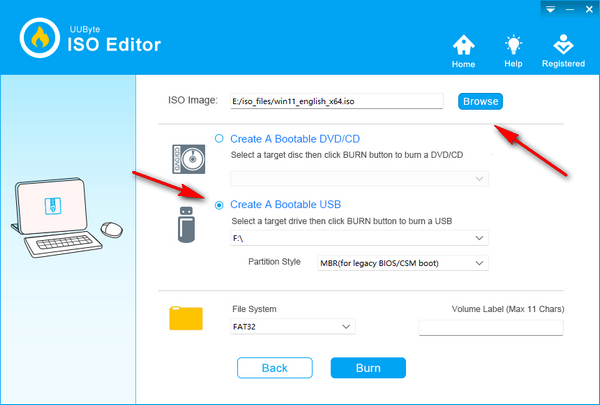
Head over to their website (https://www.uubyte.com/iso-editor.html), download it, and fire up ISO Editor app. You will get a window that gives you a couple of options, choose the one that says Burn.
Next, add Windows 11 ISO image using the Browser button, then select the USB drive, enter a volume label (this will be the name of the USB), and finally press Burn.
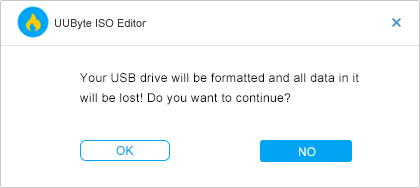
A new pop-up window shows up and ask you if you want to format this USB drive. Click OK to proceed.
This will start the process of creating Windows 11 installation media. This will take several minutes.
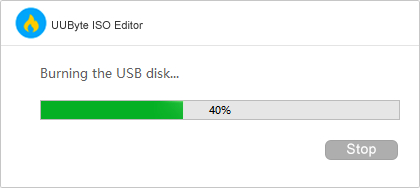
Once the process completes, simply eject USB from computer and keep it safe so that you can use it to install Windows 11 in case of emergency.
Pros:
- Simple and easy to use.
- Work on Windows and macOS.
- Get fast reply from professional support team.
- Free version available.
Cons:
- Download Windows 11 ISO manually.
The above three tools can only create one bootable OS installer on one USB drive. If you want to create multi-boot USB, then we have to take a look at the following tools.
SARDU MultiBoot Creator
SARDU MultiBoot Creation is a freemium multi-boot tool for creating bootable USB from OS images and various Windows PE images. They also have a Pro version available with added features. It helps create multi-boot USB flash drive, so that you can use a single USB to install Windows 11 and other OS. One of the benefits of using SARDU is that you do not need to reinstall the utility every time a new version of OS is released. So, if you have installed it while using Windows 10, you can still use it for Windows 11. The following tutorial tells you how to create Windows 11 bootable using SARDU MultiBoot Creator.
Download ZIP file of SARDU MultiBoot Creation from their website (https://www.sarducd.it/downloads), unzip it, and then run sardu.exe from unzipped folder.
Insert a blank USB flash drive into the computer. Click on the icon on the top left that looks like a Folder icon, then select the folder where you have downloaded Windows 11 ISO file. Now, you need to select the Windows 11 ISO from the list that pops-up on the SARDU window. From then on, click on the USB icon with the magnifying glass on it from the top right. This should detect your USB flash drive.
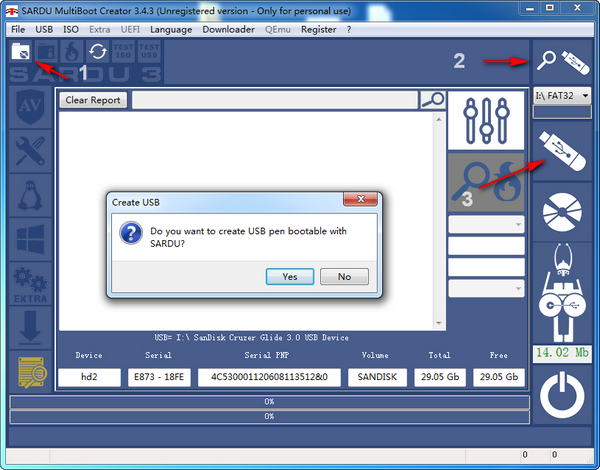
Finally, click on the USB drive icon just below the previous USB icon you had clicked on. This will throw a pop-up whether you want to create the bootable USB, click Yes to start the process. Once done, you can test the USB with the QEMU tool provided with SARDU and check if the USB is working fine.
Pros:
- Free version available.
- Does not need installation.
- Download ISO images for various OS.
- Create multi-boot USB.
- Comes with a QEMU to check the USB.
Cons:
- Pop-up purchase window each time it is opened.
- Very confusing user interface.
- Windows 11 ISO can be download only with Pro version.
- ISO burning is slow when compared to the other utilities.
WinSetupFromUSB
This is another utility that lets you create multi-boot USB, including Windows 11. However, unlike SARDU, this is completely free. It does tend to throw warning on certain antivirus, however, as per their website these are false positives. It is much more simpler than SARDU, but can not download any of the ISO files by itself. You need to download Windows 11 ISO image file by yourself for the tool to be able to use it.
How to use WinSetupFromUSB? Download WinSetupFromUSB-1-10.exe file from their website (http://www.winsetupfromusb.com/downloads/). Double click it to extract content from it. Program files will be saved to Downloads folder by default. Go to WinSetupFromUSB folder and open WinSetupFromUSB tool from there.
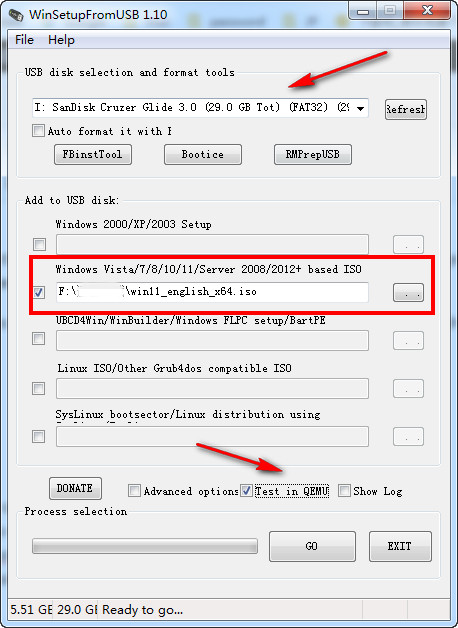
Next, insert the blank USB flash drive. Under USB disk selection and format tools section, please choose a USB flash drive.
Under ADD to USB section, click on the 3 ellipses button to load Windows 11 ISO image file next to the Windows Vista/7/8/10/11/Server 2008/2012+ based ISO box. You can add multiple other types of ISO files in this step.
Lastly, check Test in QEMU box to simulate the booting process once it has been created. Finally, click on GO to start making Windows 11 bootable USB.
Pros:
- Simple and easy to use tool.
- Free availability, no registration required either.
- Can create multiboot USB.
- Supports DOS, Windows (including Windows 11), and Linux.
Cons:
- Ugly user interface.
- Error in installing grub4doc MBR
I have used all of these utilities myself in order to create Windows 11 bootable USB. I found out Windows 11 Media Creation Tool and the UUByte ISO Editor to be the simplest. However, with the Media Creation Tool you wouldn’t have the support team available like you would have with the ISO Editor. So, personally, I would pick UUByte ISO Editor for creating Windows 11 bootable USB.